If it’s true that the design boom is coming to an end you need to focus on how to build a rock solid business. I’m not into fear mongering so we’re not going to talk about work drying up. Instead, I want to help you get your business ready so that you have a business that works for you and is as efficient as possible. If you use some of your time now and organize your client files then you never again waste time looking for anything.
Your designs will sell themselves but clients, particularly high end clients, are always looking to do business with someone that understands their business inside out. Let’s make sure that it’s you!
THE IMPORTANCE OF CREATING AN ORGANIZED FILING SYSTEM
Early on in my design career I was an organizational mess. One Sunday evening I was at home playing with my kids when a client knocked on my door (what?!). Rude, yes but I was too stunned to tell her I’d get back to her on Monday.
She wanted a document for the GC and I had no real idea where it was. I ran to my office while she stood in our entry waiting. Ugh, I’m cringing just remembering this story.
It took me way too long to find what she needed and I was overwhelmed with anxiety. I eventually found it but the situation highlighted for me how badly I needed to get organized.
Little did Rude Client know how she changed my business. I never wanted to be caught without instant access to my documents again.
You may not be dealing with clients like this but you have likely been asked for a document while at a job site. Maybe you know that overwhelming feeling of dread. Let’s get you organized so that you can reduce your anxiety and feel in control of your business.
HOW TO ORGANIZE YOUR CLIENT FILES (DIGITAL VERSION)
Which System to Use
If you don’t use anything currently, start by looking at Dropbox and Google Drive. These are simple to use and they offer the kind of storage you need. The files you use in your design business are big and not every system can handle that digital volume.
You’ll need a paid plan on Dropbox because you’ll quickly run out of storage with the free version but it’s less than $20/month. In my business, it’s some of the best money I spend.
I don’t recommend using your CRM. I live and breathe ClickUp in my business so I’m not saying don’t use it. You just don’t want all your bulky files stored here.
If you’re really committed to using a CRM then keep the heaviest files (all your drawings and space photos) in Dropbox or Google Drive and adding a link to your CRM. This will stop any lags in speed for the other work you do there.
What I’m showing you is just a suggestion on how to organize your client files. This is the exact method I used as a designer and it always worked well. If something doesn’t align with the way you work, modify it to customize to your own specific needs.
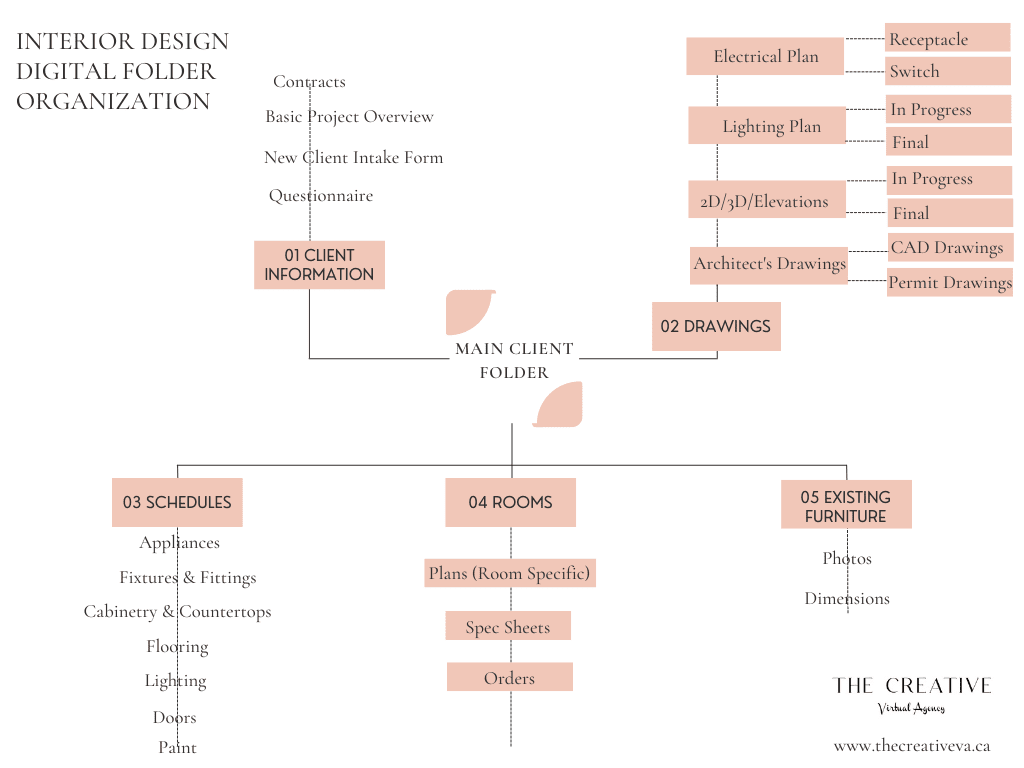
Everything in pink is a folder. Start at the centre with the client folder. Each number on here is a sub folder and nested within those are the sub sub folders.

FOLDER 1- Client Information
- Questionnaire
- New Client Intake Form
- Project Overview
- Contracts and Scope of Work
- Details about architects, contractors and trades being used
Use all the personal information you gathered regarding your clients and your contractual information. I didn’t create sub folders but you can create them if you have more documents than you can visually handle.
FOLDER 2 – Drawings
This folder is a beast and the one that requires the most organization. It’s also the heaviest so if you’re using a CRM for file management, you might want to consider using Dropbox for this folder and adding a link in your CRM.
This is how I organized my drawings file and it worked but if this doesn’t work for your brain, modify it to suit you.
- SUB FOLDER 1 – Architect’s Drawings
- CAD Drawings folder
- Permit Drawings folder
Always keep an original and make a duplicate if you’re going to be doing any work using these files.
- SUB FOLDER 2 – 2D/3D/Elevations
- In Progress folder – saved as CAD, Sketchup or Chief Architect file
- Final folder – Saved as Layout, PDF or whatever form you present
These are the files you’re creating for the entire space. Add room specific drawings like elevations for built-ins, etc. Later you’ll transfer them to the room sub folder and organized by the specific location.
- SUB FOLDER 3 – Lighting Plan
- In Progress folder – saved as CAD, Sketchup or Chief Architect file
- Final folder – Saved as Layout, PDF or whatever form you present
If you’re not responsible for creating these documents modify it to a sub folder without the additional folders nested inside. Even if you don’t create the lighting plans it’s still a good practice to have a folder to store the document as you’ll need to review it for furniture plans.
- SUB FOLDER 4 – Electrical Plan
- Receptacle Plans folder
- Switch Plans – folder
Again, if you don’t create these you don’t need the nested folders but I would still recommend the main sub folder. It’s better to have these plans for reference, particularly if there are floor outlets that will affect your furniture layout.
WANT TO CREATE BETTER PROCESSES IN YOUR DESIGN BUSINESS? READ THIS POST
FOLDER 3 – Schedules
- Appliances
- Fixtures & Fittings
- Cabinetry & Countertops
- Flooring
- Lighting
- Doors
- Paint
I don’t actually recommend creating separate schedules for each of these items. It’s easier if you use one document created in Excel (or something similar) with a new page/tab for each category. It’s less overwhelming with a single document.
FOLDER 4 – Rooms
- Room Specific Plans folder
- Spec Sheets folder
- Orders folder
I recommend creating a room folder for every room you’re working on. This way, when you have a full home as a project it’ll feel less overwhelming finding documents. It ends up defeating the purpose of trying to organize your client files if you throw them all into one folder.
FOLDER 5 – Existing Furniture
- Photos
- Dimensions
If a client is considering keeping some furniture you’ll want to make sure you document all the relevant information. After you make a decision, move this information to the room specific folder. If you decide you won’t use certain pieces, remove the information from the file. Over time, as the project progresses this file should end up empty.
After you create great systems and learn how to organize your client files I promise you, it’ll change the way you feel about your business.
My business started off a hot mess with my files but over the years I perfected this system to suit me and it gave me so much confidence. If you need more help with your business organization, reach out or view my services.